Request Employer Number for Unemployment and Disability
The Request Employer Number for Unemployment and Disability feature allows the employer to obtain a new State Employer Account Number.
Note: An Employer must already have a Federal Employer Account Number .
This request is comprised of six (6) steps; the first four steps allows the user to complete the PRSD-1 form. Step 5 pertains to the authentication of the data entered. The final step involves the confirmation of the File.

Figure 13: Steps for Registering the Request
|
DTRH User Only
|
Department of Labor and Human Resources users can find this option in the Employer Information tab.
|
Anonymous users can find this option in the Home tab prior to entering their credentials on the main page of the application.
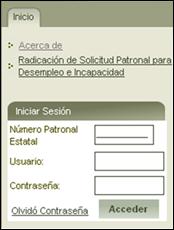
Figure 14: File the Request
Employers and Anonymous users alike can find the option in the Home tab, after having entered their credentials.
Steps to follow:
1. Enter the credentials to access the Portal (For Registered Employers or Department of Labor and Human Resources users).
2. Select the Home or Employer Information tab depending upon the users needs. A general description of the service will appear.
3. Select the Request Employer Number for Unemployment and Disability option.
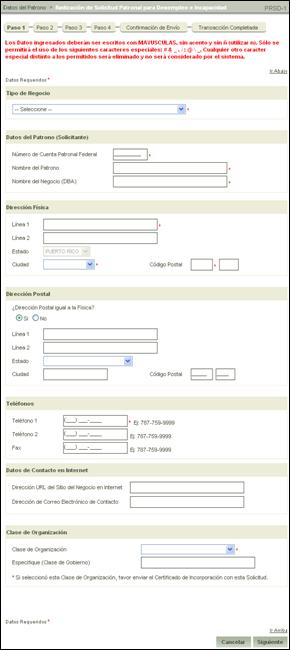
Figure 15: File Request
4. Complete the fields on the form to be registered in accordance with the responses given for each of the questions and all fields containing an asterisk (*)
5.
Select the  button to confirm the
information entered and continue to load information on to the form.
button to confirm the
information entered and continue to load information on to the form.
Note: To reload a blank
form, select the  button.
Step 2 of the transaction will be displayed.
Figure 16: File Request
6. Similar to the previous step, complete the form in accordance with the responses already provided.
7.
Select the button to continue to load
information onto the form.
Note: To reload a blank
form, select the button.
Note: To modify
information entered during a previous step, select the  button which will direct the user to
Step 1 and display the previously entered information.
button which will direct the user to
Step 1 and display the previously entered information.
Step 3 of the Transaction will be displayed.
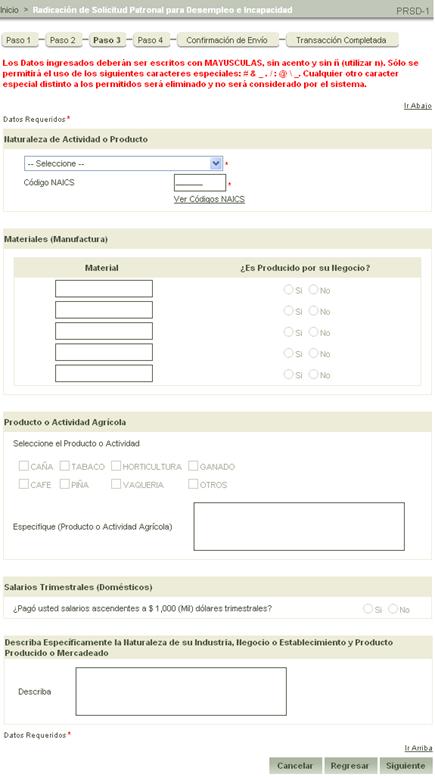
Figure 17: File Request
8. Similar to the previous step, complete the form in accordance with the responses already provided.
9.
Select the button to continue to load
information onto the form.
Note: To modify
information entered during a previous step, select the button which will direct the user to
Step 2 and display the previously entered information.
Step 4 of the transaction will be displayed.
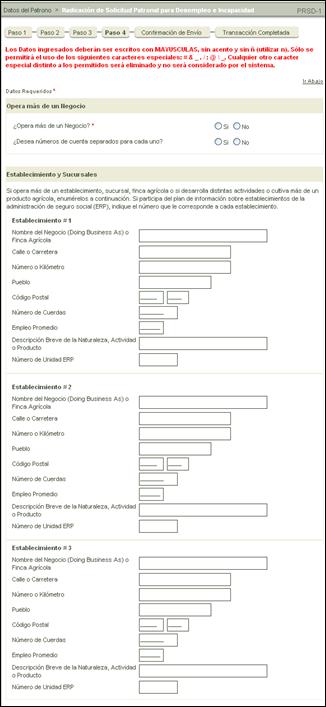
Figure 18: File Request
10. Similar to the previous step, complete the form in accordance with the responses already provided.
11. Selection of the certification box to continue is required by the application.

Figure 19: Certification of the Data Entered
12. Select the
button to continue loading information
onto the form.
Note: To reload a blank
form, select the button.
Note: To modify
information entered during a previous step, select the button which will direct the user to
Step 1 and display the previously entered information.
Confirmation Sent message is displayed.
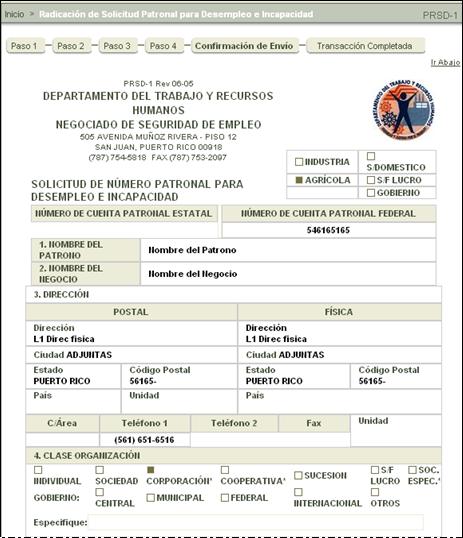
Figure 20: Form Generated
Note: To continue, select the Accept Terms and Conditions box .
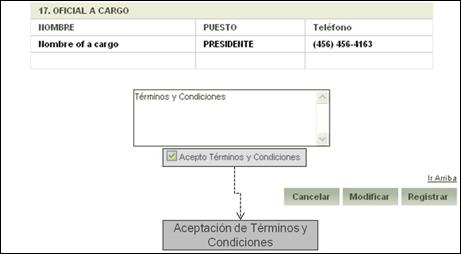
Figure 21: Accept Terms and Conditions
13. Select the
 button to confirm the information
entered.
button to confirm the information
entered.
Note: To reload a blank
form, select the button.
Note: To modify
information entered during a previous step, select the button which will direct the user to
Step 4 and display the previously entered information.
The Transaction Complete message with be displayed.
In this screen you may:
•
Print
the confirmation page of the request performed by selecting the Print
Confirmation  button;
•
Print
the registered form by selecting the Print Form  button; or
•
Save
a digital copy of the confirmation by selecting the download  button.
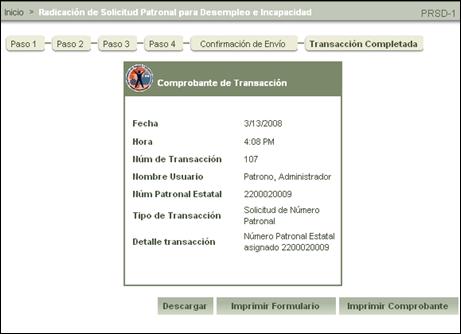
Figure 22: Confirmation of the Completed Transaction